Feb2And why is 5/8” gypsum board so darn heavy?
All of these terms are the same thing…gypsum wall board. It comes in different thicknesses and serves different purposes. Regular wall board, moisture resistant wall board, fire resistant wall board…check your local codes to see which one you need (or call me and I can help you!).
Between all of our framed soffits, there are different types of ceilings. In the center of the entertainment area and the pool table area will be a dropped, acoustical tile ceiling laid in metal grid-work. This does several things – it can be hung about 3” from the structure above, maximizing what ceiling height is there, but still allows a homeowner access to all the pipes, ducts, wiring and stuff up in the floor structure in the future if, for example, there is a leaky pipe. It also helps absorb some (I repeat – SOME) of the sound from the basement, preventing it from migrating upstairs. So while my son is enthusiastically playing Battlefield One on the Xbox in the basement, I can be working quietly in my office upstairs. I will post pictures of this type of ceiling in a later post – this doesn’t going in until after painting is done. 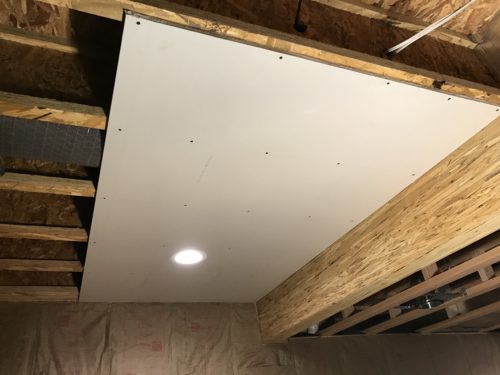
The craft area will have a higher gypsum wall board ceiling to take advantage of one of the only two small basement windows offering daylight into our basement. The bar area will also all be gypsum board ceilings with some decorative wood beams to cover the somewhat ugly structural laminated beams used by our builder. On our project, we also increased the thickness of the gypsum board from 1/2” thick (which is what we are using on all of the walls) to 5/8” thick for the ceilings only. We had some pretty wide spans (some wider than the typical 16” stud spacing to cross over some of those giant ducts) and figured the 5/8” gypsum board would have a bit more structural integrity and sag less over time. You wouldn’t think that extra 1/8” or thickness would add that much weight, but when you are lifting an 8’ x 4’ sheet of it above your head while someone drives a million screws into it to hold it up, it’s a LOT of extra weight. And now we know why contractors have lifts to hold the ceiling drywall up in place.
We also found several ways to break off the heads of some of the screws. We also learned that the drywall screw gun that I bought my husband for Christmas to help make this task easier, was a pain in the neck to use and very “touchy” if you don’t get the angle just right. When you do get it right, it drives each screw head exactly just past the flush point so the spackle guy can cover the screw heads perfectly. When it doesn’t work right, there is lots of cursing, trust me. This is where my brother earned the nickname, “Sparky,” by having to grind some of the screw stumps flat with a dremmel, causing sparks to fly…thankfully the drywall is fire rated and he doesn’t have much hair to catch fire. 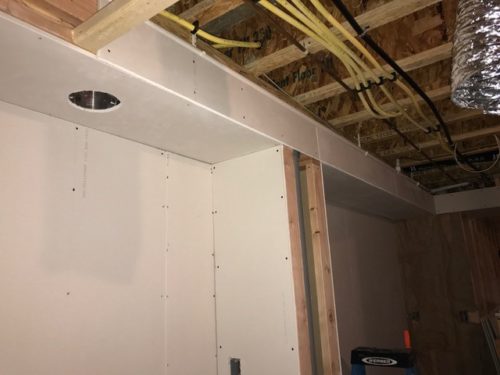
A few tips when doing gypsum board installation. You can glue the boards to the walls, but it’s not necessary. It does help with sagging over time, but we just slightly overdid the screw spacing (about 8” o.c. where we could). Screws hold better than nails over time as well and are less subject to popping. It’s important to try and keep the screw heads on the outer face of the paper on the drywall face because the gypsum board center is very crumbly (they should be slightly dimpled in). But it’s inevitable that you will push a few through. Just be as careful as you can.
Sharp utility blade knives make a huge difference too. Cutting gypsum board is relatively easy, it just takes a steady hand and a long drywall T-square. And you only have to score the face of the board and crack it to make a relatively clean cut. The rear paper just needs to be cut after bending. It is very easy to shred the paper backing, so always cut the back paper from the back paper side (not from the finished gypsum face side). 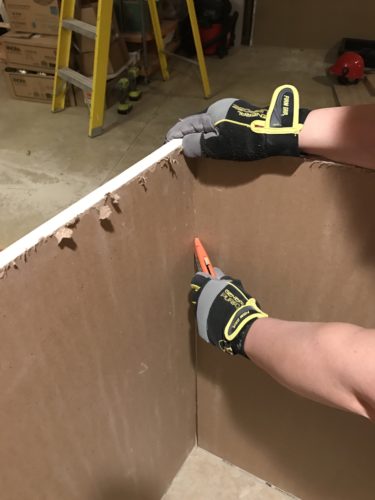
Another important tip that I got from “Brian the Spackle Guy” in Emmaus, PA, was that everywhere you can, you should aim to have tapered edges facing each other on highly visible surfaces (like soffit faces and main walls). Most drywall has tapered edges along the two long sides of the sheets. This gives an area to tape the seam and spackle in a way that makes the seam flush with the rest of the gypsum board face. Butt jointed seams are slightly raised and more noticeable along a main wall or a long run of drywall.
And, yes, Brian will be taping and spackling our gypsum board once we are done hanging it – finishing this work is an art! And we learned on our last project that we are not that kind of artists…